


This DIY Summer Deco Mesh Wreath is such an easy home decor project you can make yourself! With a step-by-step tutorial to help you craft the perfect summer wreath for a cheerful and inviting front door!

Summer is such a fun time to decorate! It’s full of fun summer themes and bright colors, and there are SO many options!
Deco Mesh wreaths are one of my favorite kinds of wreaths to make. They are not difficult, have several different versions, and learning how to make a mesh wreath is so easy!
If you want to see other types of mesh wreaths and learn how to make them, you can check out all the other deco mesh wreath tutorials below:
- DIY Leprechaun Hat Mesh Wreath
- DIY Easter Mesh Wreath
- DIY Easter Deco Mesh Wreath
- DIY American Flag Mesh Wreath
- DIY Patriotic Deco Mesh Wreath
- DIY Thanksgiving Mesh Wreath
- DIY Mesh Pumpkin Wreath
- Christmas Mesh Wreath DIY
DIY Summer Deco Mesh Wreath
I started making mesh wreath tutorials because I realized that all the mesh wreath tutorials I found weren’t detailed and didn’t include a lot of pictures. So I hope this post, and all my other wreath tutorials, is clear to follow and is easy enough for beginners too!
Step 1: Gather your supplies.

You will need:
- 12″ Wire Wreath Form
- Pipe Cleaners
- 10″ Deco Mesh (I used colors red, white, yellow, and black and white buffalo plaid)
- 2″ Wired Ribbon (I used a mix of yellow, light blue, and red plaid)
- Hello Summer Sign (Amazon has some cute ones!)
- Scissors
- Hot Glue Gun
Step 2: Prepare your wreath form.

You can buy pre-wired wreath forms, but they’re more expensive, and this method is super simple anyway.
Use pipe cleaners to create the wire to hold the deco mesh, by twisting them onto the frame, as shown.
Alternate some on the outer ring and some on the inner ring. You can see how I staggered them in the above picture.
Step 3: Attach the mesh to the wreath frame.

For this type of mesh wreath tutorial, we don’t need to cut a bunch of strips since we’re just going to twist to attach and then cut at the end.
Start by twisting the end of the mesh to the pipe cleaner, as shown above.

Alternate attaching the mesh to the inside and the outside of the wreath form.
You can bounce between every single pipe cleaner or spread it out more like I have in the example above – whatever you think looks best!
The above picture shows what it looks like once you’re done with the first “layer” of mesh.
Pro Tip: Try to make sure your mesh “bumps” are about the same height for a uniform look.

I did white next, as I didn’t want it to be a main color, but wanted to include it so that it would brighten the wreath and break up the colors.
This is what it looked like after two “layers” of mesh.
Pro Tip: If you want your wreath to be full, you should use a minimum of three layers of mesh, and up to six layers. I usually use 4-5 layers for ideal fullness.

Next, I added the buffalo plaid mesh. I liked how this pattern pulled out the colors from the sign I used!

The last layer I did was yellow. I wanted that bright, cheery color to be at the forefront of the wreath’s design! It went perfectly with the lemonade theme of the wreath and is a nice pop of color on my front door!
Step 4: Trim the pipe cleaners.

Twist the pipe cleaners a couple of times around the last layer, and then trim the excess of your pipe cleaners.
Tuck the small ends down into the wreath to keep it from being pokey!
Step 5: Attach the sign to the summer wreath.

My sign came with two pre-drilled holes at the top for the twine hanger it came attached to. I removed the twine and used the holes that were already there to attach it to the wreath.
If your sign is metal and comes without holes, use a metal punch to punch holes in all four corners.
If your sign is wooden, you can use a drill to put holes in it.
The sign I used was lightweight, so I only needed to use the two holes at the top to attach it to the wreath form.

Place the sign where you want it on your DIY Summer Deco Mesh Wreath, and then twist the pipe cleaners onto the wreath form to hold it firmly into place.
Step 6: Add ribbon accents.

I felt like my wreath needed another pop of color, so I used this cute blue ribbon to add little bows on the yellow mesh with hot glue.
Step 7: Make and attach the wreath bow.

Making a bow for a wreath can be a pain (especially one this big), but it’s not hard, just tedious. Here’s a great tutorial on how to tie a wreath bow that’s big and puffy!
I used three kinds of wired ribbon to make this bow, and did a hand-tied two-loop bow. I secured it to the wreath using a pipe cleaner, and this also held the bow together well.

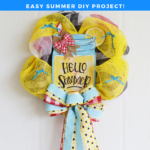
This is what my finished DIY Summer Deco Mesh Wreath looked like! I really like how it turned out, and it’s so bright and cheery on my front porch!
Even More DIY Summer Ideas!


- Citronella Jelly Candle – This Citronella Jelly Candle DIY is so simple but will keep the bugs away in style!
- DIY Patriotic Deco Mesh Wreath -This mesh wreath tutorial is easy to follow and makes adorable decor!
- Patriotic Succulent Planters – They’re super easy to make and make great holiday decor!
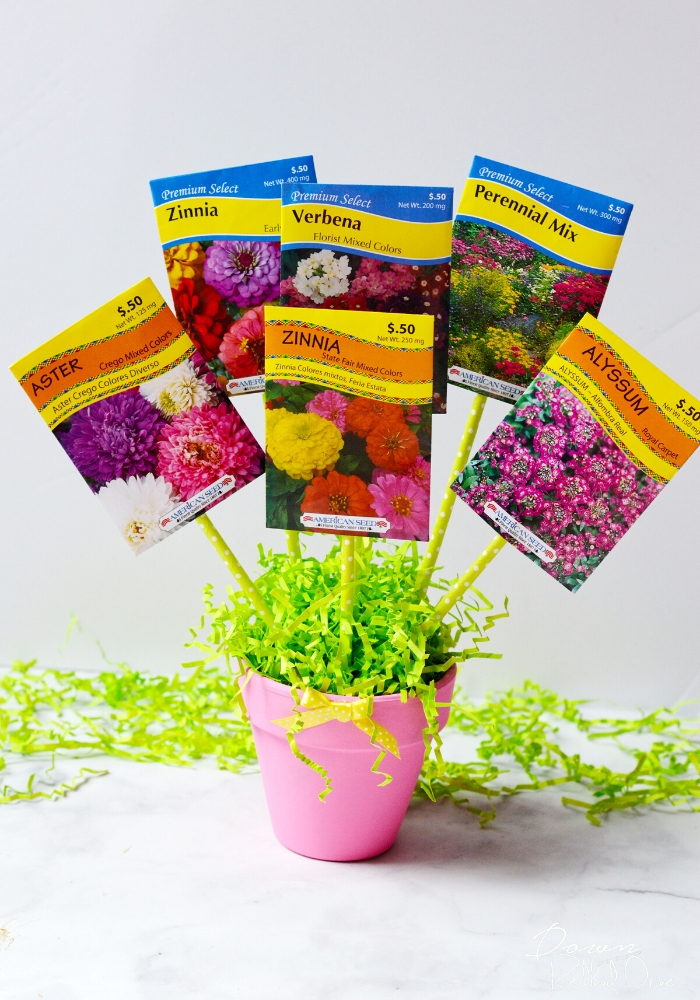
- DIY Seed Bouquet Gift – What’s better than a flower bouquet you can grow yourself like this DIY Seed Bouquet?!
This DIY Summer Deco Mesh Wreath is such a fun and easy DIY project that makes your front door so cheery!
Pin this for Later


Leave a Reply