


Celebrate St. Patrick’s Day with these delightful Stained Glass Shamrock Cookies! These festive treats feature a vibrant, translucent candy center that mimics stained glass, making them a visually stunning and delicious addition to your holiday dessert table. Perfect simple sugar cookies for sharing the luck of the Irish with friends and family!

St. Patrick’s Day is so much fun to cook for! You get to make a ton of green recipes and I love the excuse to bake for my family! They love it when I get out the mixing bowls because they know something yummy is coming!
These Stained Glass Shamrock Cookies blew their minds and they love them because they get to help. These are really a foolproof recipe, and they turn out great every time.
Stained Glass Shamrock Cookies
While they look very impressive, the process of making the stained glass part of these cookies is so easy! You can customize the colors completely or even make them for other holidays like these American Flag Stained Glass Cookies!
But making them for the first time can seem overwhelming, so here is a quick video to show you that the process really is very simple! Below the video I’ve also included the step-by-step instructions!
Step 1: Make the dough.
You can find the full printable recipe for my foolproof sugar cookies at the end of the post! Just add a little green food coloring (we use this all-natural food coloring) and you’re good to go!

I found it easiest to cut the shamrock centers out of the round cookies on the baking sheet. I used a 3″ circle cookie cutter to cut my circles and THIS shamrock cookie cutter I found on Amazon.
Pro Tip: You can use the shamrock cut out to make THESE adorable St. Patrick’s Day cookies too! Two batches of cookies with one recipe!
Step 2: Make the filling.

Next, you will need to use a food processor (I used a Magic Bullet because it was small and seemed easier to use for this recipe) to crush your Jolly Ranchers. I used purple, blue, green, and red Jolly Ranchers.
I used a small spoon to spoon the crushed candy into the shamrock center in layers as shown. I love making stained glass cookies! We make these Stained Glass Cross Cookies for Easter and these American Flag Stained Glass cookies every year too!
Step 3: Bake the cookies.
When you bake these cookies, don’t over-bake them. Cook them for 8-9 minutes ONLY and then remove them from the oven. They will continue to cook on the pan for a few minutes after they’re out of the oven.
Wait about 10 minutes for the candy shamrocks to cool, and then use a spatula (metal works best) to remove them from the pan and place them on a cooling rack to finish cooling.

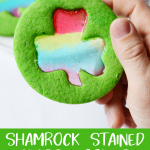
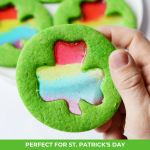
When your Stained Glass Shamrock Cookies have cooled completely, this is what they will look like! My kids really liked holding them up to the light to see through the candy.
These would be super cute to make on St. Patrick’s Day or to send with your kids to school for an after-lunch snack!
Even more St. Patrick’s Day recipes!
- Shamrock Sprinkle Cookies – use the shamrocks you cut out from these Stained Glass Shamrock cookies to make these!
- No Bake St. Patrick’s Day Cheesecake – easy and oh so green!
- St. Patrick’s Day Sprinkle Cookies – these MELT in your mouth!
- 56+ Green Food Recipes – all the cute green food (healthy and sweet!) you need to make St. Patrick’s Day food awesome!
Stained Glass Shamrock Cookies
Video
Ingredients
- 1 cup butter
- 1 cup sugar
- 1 large egg
- 1 teaspoon vanilla
- 1/2 teaspoon almond extract (optional)
- 2 teaspoons baking powder
- 3 cups flour
- green food coloring
- Jolly Ranchers in green, blue, red, and purple flavors, about 5-6 of each color.
- Non-stick spray
Instructions
- Pre-heat your oven to 350.
- In a mixing bowl, cream the butter and sugar together.
- Add in the egg, vanilla, and almond and mix well. Mix in the green food coloring.
- In a separate bowl, mix together the flour and baking powder.
- Add in half the flour mixture to the wet mixture and mix.
- Add in the second half of the flour mixture, and mix. The mixture will be dry, but keep mixing and kneading until it’s a soft, pliable consistency (like play dough).
- Sprinkle flour on a flat surface, and on top of your ball of dough, and roll it until it’s about 1/4″ – 1/3″ thick.
- Cut your circles out using a 3″ circle cookie cutter, and place them on a cookie sheet that’s been sprayed with non-stick spray.
- Use your shamrock cookie cutters to cut the shamrocks out of the circles.
- Grind your candy one color at a time until it’s in small pieces.
- Layer it in the shamrock centers. I started with purple, then did blue, green, and finally red on top.
- Bake them at 350 for 8-9 minutes and then remove them from the oven.
- Let them cool on the pan for 5-10 minutes, until the candy has hardened.
- Use a metal spatula to remove them from the cookie sheet once the candy is hard and place them on a cooling rack to let them finish cooling.
Notes
- Don’t overbake. At 8-9 minutes, they’re done, I promise. Take them out and let the residual heat of the pan continue cooking them while they cool.
- Let them cool before trying to remove them from the pan. A flat, hard spatula works best.
Nutrition
Pin this for Later


Made them, so cute!
I love how they turn out!!! SO glad you loved them too!
Oh these are so cute! I am going to have make these next month.
Thanks, Mandy!