


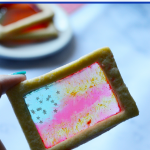
These American Flag Stained Glass Cookies are an adorable addition to your next patriotic get-together! Kids love to help with these, and they’re so much easier than decorating frosted cookies or cupcakes! Perfect for the 4th of July!

I am AWFUL at decorating frosted cookies. I have zero skill in that area, so I have to be creative to make festive treats. This year for our 4th of July get-together that we always host, I’m making these super cute American Flag Stained Glass Cookies! They’re not hard, and they turn out super cool!
If you want some more red, white and blue foods you can make this time of year, try some of my favorites… like my Patriotic Fruit Salad, and No-Bake American Flag Cheesecake!
How do you make American Flag Stained Glass Cookies?
While it may seem like a complicated process, it’s actually SUPER simple. Seriously, once you make them you’ll want to make these stained glass cookies themed for every season!
Here’s a step-by-step breakdown of the process, and the full recipe with measurements is available to print at the end of the post.
Step 1: Make the cookie dough.
The dough recipe for these is super simple. The flavor is great, and it doesn’t need chilling to keep its shape, which is great because I’m always running behind it feels like.
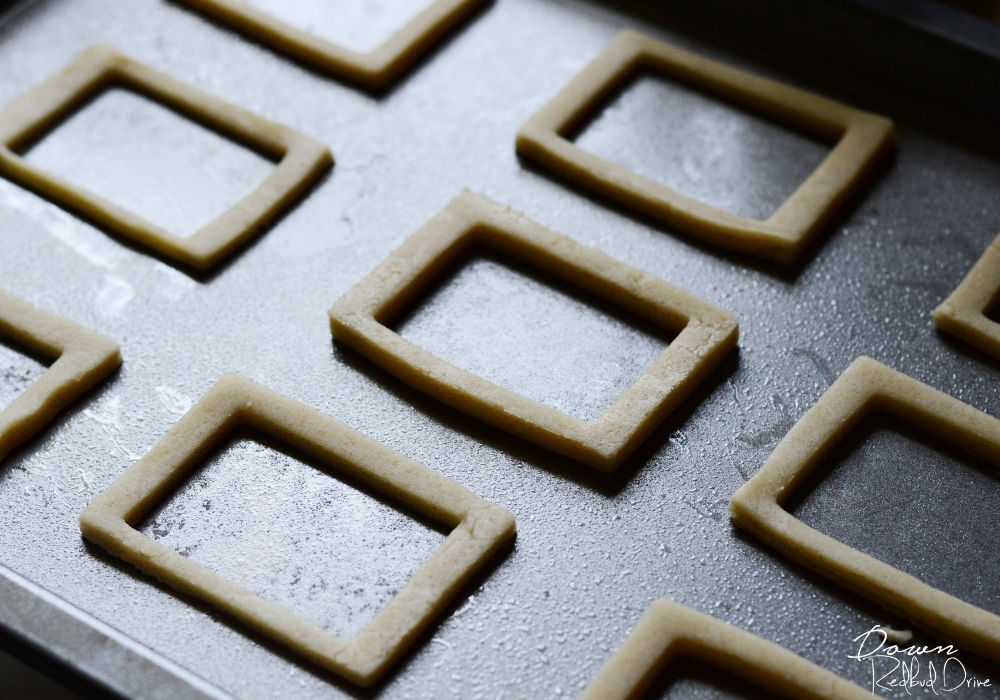
I used this set of rectangle cookie cutters to make these American Flag Stained Glass Cookies. I used the biggest one to cut out the biggest rectangle. Then I used two steps down from that size to cut out the window in the middle to make the stained glass flag.
Place them on a cookie sheet that’s been liberally sprayed with non-stick spray.
Step 2: Make candy powder.

I used Jolly Ranchers to make the red and blue powder, and pineapple Lifesavers for the “white”. I could probably have found better white, but I wanted it to be easily accessible for anybody to find in their grocery store. I used my little Magic Bullet to grind 5-6 candies each into a powder for easy spreading.
If you don’t have a Magic Bullet, that’s fine. You can also put them in a baggie and just crush them with a rolling pin or meat mallet. The candies need to be small enough to make the thin lines with!
Step 3: Add the blue.

When I made mine, I used a small baby spoon to spoon a bit of blue into the corner of the opening first. This seemed easiest to me for making the shapes.
Step 4: Adding the stripes.

I used the baby spoon to add the red top and bottom stripes first, then added the two white stripes, then finally filled the middle with the last red stripe. These don’t have to be perfect as they will melt, but don’t overfill, and try to keep the candy powder off the cookie itself on top because it does show up after baking.
Step 5: Bake and cool.

Once you’re finished, bake in a 350°F pre-heated oven for 8-9 minutes. Don’t overbake, they’re done after 9 minutes I promise. Immediately sprinkle on a few of the edible stars onto the blue section to ensure they will stick. I found the cute silver edible stars on Amazon (they are the same ones I used in my American Flag cheesecake too!)
Let them cool on the pan for about 5-10 minutes, then use a sturdy spatula to carefully pop them off the pan and place the cookies on a cooling rack to finish cooling after that. You may have one or two crack if you’re not careful, so take your time. These are best served fresh, so don’t store them days before, but rather serve them after cooling, or the day of for best results.
If you have extra dough or want to make two kinds of cookies with the same batch of dough, check out these Patriotic Sprinkle Cookies!
Even More Ideas for 4th of July
- DIY 4th of July Party Decorations and Ideas
- No-Bake American Flag Cheesecake
- Hand-Print American Flag T-Shirt Craft

American Flag Stained Glass Cookies
Ingredients
- 1 cup butter
- 1 cup sugar
- 1 large egg
- 1 teaspoon vanilla
- ½ teaspoon almond extract
- 2 teaspoons baking powder
- 3 cups flour
- Jolly Ranchers in red and blue flavors, about 5-6 of each color.
- Lifesavers pineapple flavor about 5-6.
- Non-stick spray
Instructions
- Pre-heat your oven to 350°F.
- In a mixing bowl, cream the butter and sugar together.
- Add in the egg, vanilla, and almond and mix well.
- In a separate bowl, mix together the flour and baking powder.
- Add in half the flour mixture to the wet mixture and mix.
- Add in the second half of the flour mixture, and mix. The mixture will be dry, but keep mixing and kneading until it's a soft, pliable consistency (like play dough).
- Sprinkle flour on a flat surface, and on top of your ball of dough, and roll it until it's about ¼" – ⅓" thick.
- Cut your rectangles out using the cookie cutter set listed, and place them on a cookie sheet that's been sprayed with non-stick spray.
- Use your smaller rectangle cookie cutter to cut the small rectangle out of the big rectangle.
- Grind your candy one color at a time until it's in small pieces.
- Make your flag designs using the crushed candy. I started with the blue corner, then did the top and bottom red stripes, then the two white stripes, then finished with the last red stripe in the middle.
- Bake them at 350 for 8-9 minutes and then remove them from the oven.
- Immediately add the silver stars to the blue from the oven. If you wait too long they won't stick.
- Let them cool on the pan for 5-10 minutes, until the candy has hardened.
- Use a metal spatula to remove them from the cookie sheet once the candy is hard and place them on a cooling rack to let them finish cooling.
Notes
- Don’t overbake. 8-9 minutes is plenty.
- Don’t pop them off the pan too soon or they will crack.
- Don’t store them for a long time before serving. They’re best served the day of.
Nutrition
Pin this for Later


Leave a Reply